Ergonomic Risk Assessment: Your 5-Minute Screen Worker Self-Check
A personal ergonomic risk assessment is a quick, structured self-check that identifies the specific ways your workstation and posture are loading your body during long screen sessions. Right now, in the next 60 seconds, check these three things:
- Monitor height: Is the top of your screen at or slightly below eye level? If you’re tilting your chin up, your neck is already under strain.
- Chair support: Do your feet rest flat on the floor (or a footrest), with your knees at roughly 90°? If your feet are dangling or your lower back has no support, that’s your highest-risk failure.
- Keyboard and mouse position: Are your elbows close to 90° with your shoulders relaxed? Reaching forward or up even a few inches adds up fast over eight hours.
Pro Tip: If you can only fix one thing today, fix your lumbar support. Sustained lower-back flexion during long sitting sessions is the highest-load, highest-frequency risk for screen workers.
Key Takeaways
A personal ergonomic risk assessment is the fastest way to identify which part of your setup is causing the most strain and what to fix first.
| Point | Details |
|---|---|
| Start with three checks | Monitor height, lumbar support, and elbow angle are the highest-impact items to assess first. |
| Score your checklist | Six or more “No” answers signals high cumulative risk; fix chair and monitor before accessories. |
| Use simple measurements | Monitor at arm’s length (18–20 inches), top of screen at or below eye level, elbows at roughly 90°. |
| Move every 20–30 minutes | Micro-breaks of 30–60 seconds reduce musculoskeletal strain even when your posture is good. |
| Habitposture products | Posture correctors, back braces, and ergonomic chairs from Habitposture address the most common checklist failures for screen workers. |
Table of Contents
- What does a personal ergonomic risk assessment actually check?
- How to measure your workstation with simple tools
- How to interpret your score and prioritize fixes
- Which products solve which checklist failures?
- What features actually matter when you’re buying ergonomic gear?
- Daily habits that cut your cumulative risk
- When should you stop self-assessing and see a clinician?
- How this checklist was built and what sources back it
- How to track your progress over time
- Why Habitposture focuses on habits, not perfection
- Habitposture gear that matches your checklist results
- Sources
What does a personal ergonomic risk assessment actually check?
Run through this yes/no checklist. Count your “No” answers. Each one is a risk point.
Chair
- Feet flat on the floor or supported by a footrest?
- Knees at roughly 90°, thighs roughly parallel to the floor?
- About 1–2 inches of clearance between the back of your knees and the seat edge?
- Lower back supported by the chair’s lumbar curve or an added cushion?
Monitor
- Top of screen at or slightly below eye level?
- Screen positioned about 18–20 inches away (arm’s length) per the Personal Workstation Checklist?
- No significant glare hitting the screen from windows or overhead lights?
Keyboard and mouse
- Elbows at about a right angle, upper arms relaxed at your sides?
- Wrists neutral (not bent up, down, or sideways) while typing?
- Mouse within easy reach, not requiring shoulder extension?
Laptop setup
- If using a laptop as your primary screen, is it on a stand with an external keyboard and mouse?
Accessories and breaks
- Do you take a micro-break at least every 20–30 minutes?
- Do you stand or walk at least once every 45–60 minutes?
Scoring your results:
- 0–2 “No” answers: Low risk. Maintain your setup and keep moving.
- 3–5 “No” answers: Moderate risk. Address the highest-load failures first (chair and monitor before accessories).
- 6+ “No” answers: High risk. Your setup is compounding strain across multiple body regions. Prioritize fixes this week.
Pro Tip: Don’t try to fix everything at once. Pick the two “No” answers that affect your most painful or fatigued body part and solve those first.
How to measure your workstation with simple tools
You don’t need a specialist. A tape measure, your smartphone camera, and a few minutes are enough.
Key measurements and targets, supported by the OSHA Computer Workstation Self-Assessment Checklist:
- Monitor distance: 18–20 inches from your eyes. Extend your arm; your fingertips should nearly touch the screen.
- Monitor height: Top of the screen at or just below eye level. Tilt the screen back 10–20° so your gaze lands near the center.
- Elbow angle: Roughly 90°, upper arms hanging naturally. Use a protractor app or simply check that your forearms are parallel to the floor.
- Knee clearance: Slide two fingers behind your knee at the seat edge. If it’s tight, your seat is too deep.
- Feet: Flat on the floor or on a footrest, with thighs roughly parallel to the floor.
Photo-diagnostic workflow: Take a side-view photo while sitting in your normal working position (not your “good posture” pose). Look for forward head position, rounded shoulders, and lower-back curve. Take a second photo after adjustments. These before/after images are your baseline record. See desk setup examples for long workdays for visual reference.
Pro Tip: If you wear bifocals or progressive lenses, set your monitor slightly lower than standard eye-level guidance. You need to look through the lower portion of your lenses, so a higher screen forces you to tilt your head back uncomfortably.
How to interpret your score and prioritize fixes
Not all “No” answers carry equal weight. The UCLA Health guidance on prolonged sitting confirms that sustained spinal strain from poor lumbar support is among the most damaging patterns for desk workers.
Use this order:
- High-frequency, high-load failures first. Lumbar support and monitor height affect you every minute you sit. Fix these before anything else.
- Visibility and comfort issues second. Glare, mouse reach, and wrist angle matter, but they’re easier to tolerate short-term while you budget for better gear.
- Accessory gaps last. A footrest or document holder improves comfort but rarely causes acute injury on its own.
Two common scenarios:
- Low score, upper-back rounding: Your chair and monitor may be fine, but you’re leaning forward to read. Move the monitor closer, increase font size, and add a lumbar roll.
- High score, leg numbness: Your seat is likely too deep or too high. Adjust seat height first, then add a footrest if needed.
Pro Tip: Stage your purchases. Fix the chair and lumbar support in week one (often under $50 with a cushion). Add a monitor arm or stand in week two. A sit-stand converter or premium chair can wait until you’ve confirmed the lower-cost fixes work.
Which products solve which checklist failures?
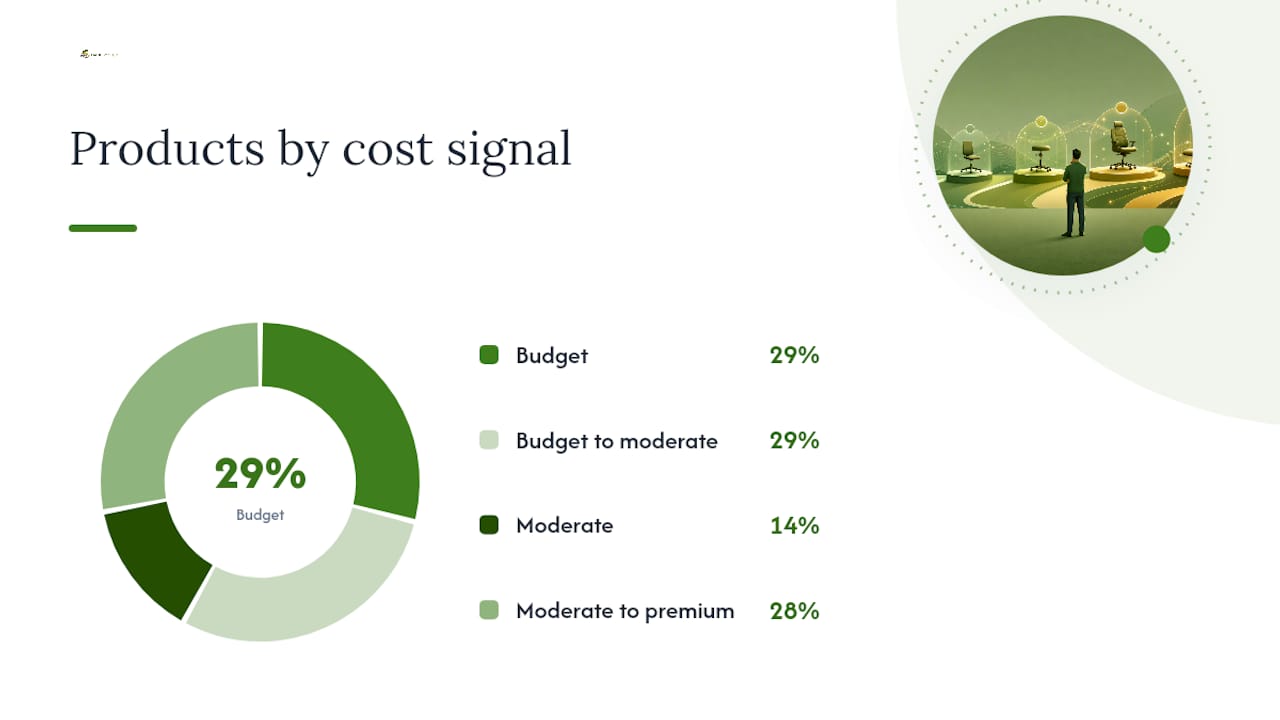
| Product category | What it fixes | Best for | Cost signal |
|---|---|---|---|
| Ergonomic chair | Lumbar support, seat depth, height | Anyone sitting 6+ hours daily | Moderate to premium |
| Lumbar cushion | Lower-back support on any chair | Budget fix or travel | Budget |
| Monitor arm or riser | Screen height and distance | Fixed-desk setups | Budget to moderate |
| Laptop stand + external keyboard/mouse | Screen height on laptops | Remote workers, home offices | Budget to moderate |
| Footrest | Foot and thigh support | Shorter users, non-adjustable desks | Budget |
| Posture wearable/biofeedback device | Habit retraining for shoulder/back rounding | People who know their posture but keep forgetting | Moderate |
| Sit-stand desk or converter | Reduces static sitting load | High-volume screen users | Moderate to premium |
Posture correctors and biofeedback devices include strap devices, supportive garments, and biofeedback vests. Evidence of effectiveness is mixed, with some studies showing short-term benefits. Devices paired with a structured training program tend to show more promise than passive braces alone.
A layered approach works best: a good ergonomic chair handles passive structural support, while a biofeedback wearable handles habit retraining. Neither product alone solves both problems. For ergonomic accessories tailored to remote workers, the combination of a lumbar cushion and a laptop stand covers the two most common home-office failures at a low combined cost.
Pro Tip: Don’t expect one product to fix everything. A validated chair plus a short daily biofeedback routine outperforms either tool used alone.
What features actually matter when you’re buying ergonomic gear?
Marketing copy loves words like “ergonomic” and “premium.” Here’s what to look for instead, drawing on the Office Ergonomics Checklist self-evaluation:
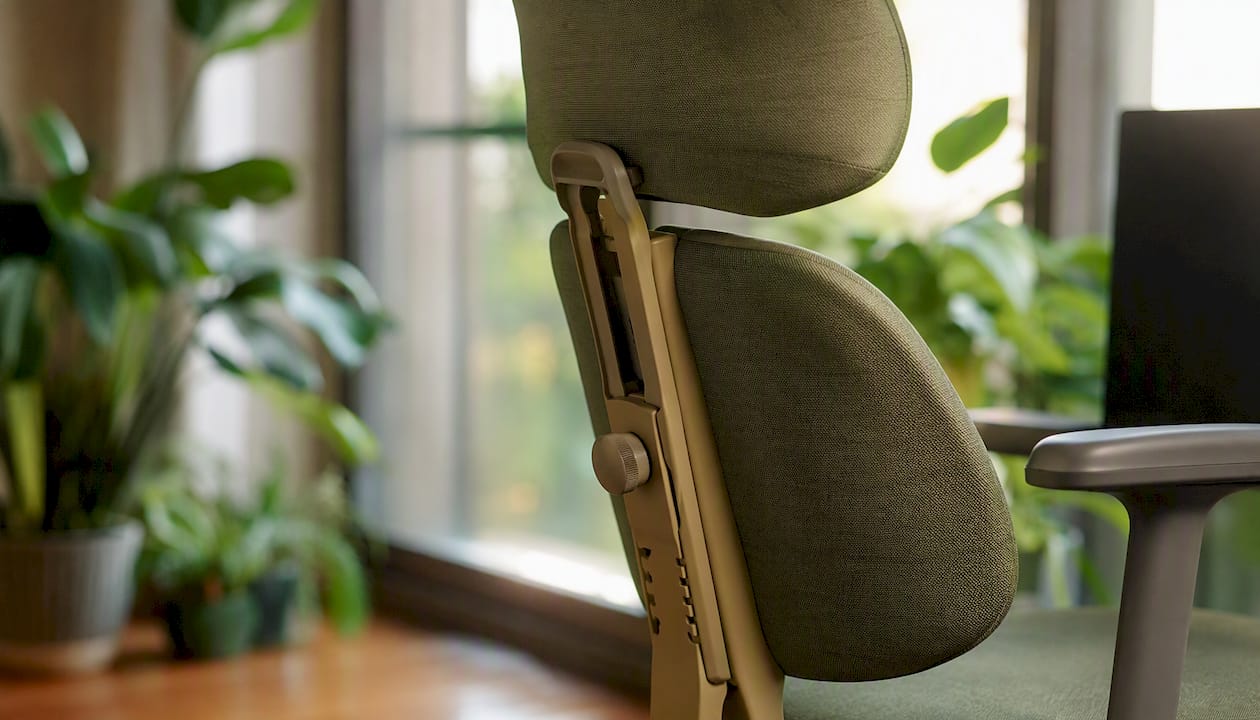
Chairs: Adjustable lumbar height and depth (not fixed), seat depth adjustment or multiple seat sizes, five-leg base, height-adjustable armrests. Red flag: fixed lumbar pad with no depth or height control.
Monitor arms: Full range of height, tilt, and swivel; VESA compatibility (75×75 or 100×100 mm). Red flag: arms that only tilt, not raise or lower.
Laptop stands: Stable at your target height, adjustable tilt, non-slip surface. Red flag: single fixed-height risers.
Posture wearables: Built-in biofeedback with a training program, not just a passive strap. Red flag: no app or structured routine included.
Before buying a chair: Measure your seated thigh length (back of knee to back of hip). This is your target seat depth. Most chairs list seat depth in specs; match it before ordering.
Always check return policy length and real-user photos in reviews. Marketing photos show models in ideal positions; customer photos show how the product actually looks in use.
Daily habits that cut your cumulative risk
Good equipment only works if you move. The SAIF Office Ergonomics Self-Assessment stresses that even neutral postures cause fatigue when held statically for too long. Micro-breaks of 30–60 seconds every 20–30 minutes are among the most effective ways to reduce musculoskeletal strain.
- Every 20 minutes: Look 20 feet away for 20 seconds (20-20-20 rule for eyes).
- Every 20–30 minutes: Stand, stretch your hip flexors, roll your shoulders back. Thirty seconds is enough.
- Every 45–60 minutes: Walk to another room, refill water, take a short call standing up.
- Simple desk stretch sequence: Chin tuck, shoulder blade squeeze, seated hip flexor stretch, wrist extension hold. Under two minutes total.
Set a phone timer or use your OS’s built-in focus/break reminders. A wearable with vibration alerts removes the need to remember entirely.
Pro Tip: Variety is the goal, not perfection. Alternating between sitting, standing, and moving throughout the day reduces cumulative load even when your individual postures aren’t textbook-perfect.
When should you stop self-assessing and see a clinician?
Self-assessment covers setup and habits. It doesn’t cover injury. See a physical therapist, occupational therapist, or physician if you notice:
- Pain that persists after rest or doesn’t improve within a few days of fixing your setup
- Numbness or tingling into your arms, hands, legs, or feet
- Weakness in your grip or arms
- Pain that disrupts sleep or daily tasks outside of work
When you book an appointment, bring your side-view photos, your checklist score, your measurement notes, and a brief symptom timeline (when it started, what makes it better or worse). That information cuts your appointment time significantly.
Pro Tip: Look for a physical therapist or occupational therapist with specific experience in screen-work or office ergonomics. A clinician who understands desk-based patterns will give you more targeted guidance than a general practitioner.
How this checklist was built and what sources back it
This guidance was developed by Thomas and the Habitposture team, drawing on Habitposture’s focus on posture products and education for screen-based lifestyles. The checklist synthesizes established workstation assessment frameworks from the following authoritative sources:
- Personal Workstation Checklist, UC Berkeley — neutral alignment targets and measurement benchmarks
- OSHA Computer Workstation Ergonomics Self-Assessment — neutral-posture criteria across all body regions
- Office Ergonomics Checklist, University of Utah Risk Management — chair, monitor, and accessory checklist items
- UCLA Health: Ergonomics for Prolonged Sitting — clinical context for spinal strain
- SAIF Office Ergonomics Self-Assessment Worksheet — micro-break and movement guidance
- Yale EHS Office Ergonomics Self-Assessment — validated institutional checklist format
How to track your progress over time
A one-time assessment gives you a starting point. Tracking gives you proof that your changes are working.
After your first assessment, save your side-view photo, your checklist score, and your top three “No” answers in a simple note or folder. Recheck every four to six weeks using the same checklist. Retake the side-view photo in the same position and lighting. Compare the two images side by side.
Note which symptoms have improved (less afternoon neck ache, no leg numbness) and which persist. If a symptom persists after two rounds of fixes, that’s a signal to consult a clinician rather than buy another product. For office chair adjustment guidance with before/after examples, Habitposture’s blog covers the most common adjustment sequences step by step.
Why Habitposture focuses on habits, not perfection
Posture isn’t a problem you solve once. It’s a pattern you retrain, a little at a time, every day. That’s the core of how Habitposture approaches product design and advice. The goal isn’t a perfect setup that you maintain for eight hours straight. The goal is a setup that’s good enough, paired with small, repeatable habits that keep your body moving and supported throughout the day. Products should work with your real life, not require you to sit like a statue to benefit from them. That’s why the recommendations here combine structural support (chair, lumbar cushion, stand) with habit tools (wearables, timers, movement cues). Small actions, repeated consistently, produce better long-term outcomes than any single product purchase.
Habitposture gear that matches your checklist results
Once you know which checklist items you failed, the next step is matching the right product to the right problem. Habitposture’s posture correctors, adjustable back braces, and high-back ergonomic chairs are built specifically for people who sit 8+ hours at a screen. Whether your assessment flagged lumbar support, shoulder rounding, or general fatigue, there’s a targeted option in the catalog. The posture correctors pair well with a structured daily routine for habit retraining. The chairs address seat depth and lumbar support in one purchase. Browse the full range and find the product that matches your highest-priority checklist failure at Habitposture.
Sources
- Personal Workstation Checklist
- Office Ergonomics Checklist self-evaluation
- Computer Workstation Ergonomics: Self-Assessment Checklist
- Ergonomic and proper posture for sitting - Spine Care | UCLA Health
- Office ergonomics: Self-assessment worksheet
- Do posture correctors work? — Medical News Today