Proper Wrist Position for Typing: Set Up Your Desk Right
The proper wrist position for typing is a neutral wrist: a straight line running from your forearm through your wrist to your fingertips, with no bending up, down, or sideways. That single alignment is what keeps carpal tunnel pressure low and keeps you typing comfortably through a full workday. Research backs a clear pair of thresholds: avoid sustained wrist extension beyond a moderate angle and radial deviation beyond a moderate angle during long typing sessions.
Run this quick self-check right now:
- Thumb alignment: Your thumb should sit roughly in line with your forearm, not angled sharply inward.
- Wrist extension: Look at your wrist from the side. If the back of your hand tilts up more than a gentle rise, your keyboard is too high.
- Ulnar/radial deviation: Look from above. Your wrists should point straight ahead, not bent toward your pinky or thumb.
- Arm support: Your elbows should rest near your sides at roughly 90–110°, with forearms roughly parallel to the floor.
- Keyboard height: If your shoulders are shrugging or your wrists are cocked upward, lower the keyboard or raise your chair.
If any of these checks fail, the fix is usually simple: lower the keyboard, raise the chair, or float your wrists instead of resting them on a hard surface while you type.
Key Takeaways
Neutral wrist posture, defined as a straight line from forearm to fingertips with no sustained extension beyond 30° or radial deviation beyond 15°, is the single most effective structural change you can make to reduce typing-related wrist strain.
| Point | Details |
|---|---|
| Neutral wrist defined | Keep a straight line from forearm to fingertips; avoid extension over 30° and radial deviation over 15°. |
| Keyboard placement | Set the keyboard at or just below elbow height with a flat or negative tilt to prevent upward wrist bending. |
| Wrist rests | Use them only during pauses, not while actively typing; floating wrists during keystrokes reduces strain. |
| Breaks and movement | Take a microbreak every 20–30 minutes; typing itself raises carpal tunnel pressure, so movement is part of the fix. |
| Habitposture supports | Lightweight Habitposture supports work as posture reminders during the adaptation phase alongside correct desk setup. |
Table of Contents
- What does “neutral wrist” actually mean for your body?
- How to set up your workstation for neutral wrist alignment
- Which keyboards, mice, and accessories actually help?
- Stretches, strengthening moves, and microbreaks that protect your wrists
- Common wrist posture mistakes and quick fixes you can do right now
- How to make neutral wrist positioning a lasting habit
- The part most ergonomics guides skip
- Lightweight support for the habit-building phase
- Sources
What does “neutral wrist” actually mean for your body?
Neutral wrist posture is not just a comfort preference. It is a biomechanical position that directly affects the pressure inside your carpal tunnel, the narrow passage in your wrist through which the median nerve and nine tendons pass.
Your wrist moves in two planes. Flexion bends the palm toward the forearm; extension bends the back of the hand upward. Radial deviation tilts the wrist toward the thumb side; ulnar deviation tilts it toward the pinky. Conventional keyboards, placed flat on a desk at standard desk height, tend to push most people into both extension and ulnar deviation at the same time.
The evidence: An in-vivo study on carpal tunnel pressure measured wrist angles and carpal tunnel pressure during typing and found a U-shaped relationship: pressure is lowest near neutral and rises with increasing extension and radial deviation. The authors specifically recommended avoiding wrist extension greater than 30° and radial deviation greater than 15° during long typing sessions.
That U-shaped curve matters because it tells you the goal is not zero movement. Small, transient wrist angles during normal typing are fine. The problem is sustained deviation held for minutes or hours at a stretch. The same research also noted that the act of typing itself raises carpal tunnel pressure slightly above a static neutral hold, which is why posture alone is not the complete answer: breaks and movement matter too.
The Cleveland Clinic links sustained non-neutral wrist postures with increased risk for carpal tunnel syndrome symptoms, including numbness, tingling, and weakness in the hand. Catching and correcting your wrist angle early is far easier than managing symptoms after they develop.
Key biomechanical points to keep in mind:
- Extension is the riskier direction: the carpal tunnel narrows more with extension than with flexion.
- Radial deviation (wrist bent toward the thumb) compounds extension risk.
- Ulnar deviation (wrist bent toward the pinky) is common with wide keyboards and mouse reaching.
- Pressure rises with both angle and duration, so a moderate angle held all day is worse than a sharp angle held for a second.
How to set up your workstation for neutral wrist alignment
Getting your wrist alignment right starts with your chair, not your keyboard. The keyboard is the last thing you adjust.
- Set your seat height first. Sit with your feet flat on the floor (or on a footrest). Your thighs should be roughly parallel to the floor. This is the foundation everything else builds on.
- Find your elbow angle. Let your arms hang relaxed, then bend your elbows to about 90–110°. Your forearms should be roughly parallel to the floor or angled very slightly downward. This is the height your keyboard needs to match.
- Position the keyboard at or just below elbow height. Cornell Human Factors recommends placing the keyboard below seated elbow height with a gentle negative slope (the far edge of the keyboard lower than the near edge, sloping away from you). This keeps your wrists from bending upward to reach the keys. If your desk is too high, a keyboard tray that mounts under the desk surface is the most direct fix.
- Set keyboard tilt. Flip down the keyboard’s built-in legs if they push the back of the keyboard up. That “positive tilt” is the default for most keyboards, and it forces wrist extension. Flat or slightly negative tilt is almost always better for wrist neutrality.
- Adjust armrests. Set them so your forearms rest lightly without your shoulders shrugging. Armrests support your forearms during pauses, but they should not be so high that they push your shoulders up or so low that you are leaning sideways to reach them. During active typing, let your arms float slightly rather than anchoring your wrists.
- Place the mouse close. The mouse should sit right beside the keyboard at the same height, reachable without extending your arm outward. Reaching forces ulnar deviation. OSHA’s workstation guidance covers this alongside keyboard tray and wrist support positioning.
- Check your monitor. Your screen should be at roughly arm’s length, with the top of the monitor at or just below eye level. A screen that is too low pulls your head and shoulders forward, which cascades into wrist tension. See neck alignment guidance for the full monitor setup.
Pro Tip: Run a five-minute typing check after setup. Type normally for a few minutes, then pause and look at your wrists from the side and from above. If you see any upward bend or sideways tilt, note which direction and adjust the keyboard height or tray angle by small increments until both views show a straight line.
Which keyboards, mice, and accessories actually help?
Hardware can make neutral wrist posture easier to maintain, but it is not a substitute for correct setup. Think of it as reducing the margin for error, not eliminating the need for good positioning.
Keyboards:
- Low-profile keyboards have shallower key travel and a thinner profile, which reduces the angle your wrists need to clear the keyboard edge. They are the easiest upgrade for most people.
- Negative-slope keyboards and adjustable trays let you tilt the keyboard away from you, directly addressing the extension problem. A keyboard tray with a tilt mechanism is one of the most cost-effective changes for a fixed desk.
- Split keyboards divide the keyboard into two halves that you can position at shoulder width, reducing ulnar deviation. Studies show split keyboards reduce mean ulnar deviation toward neutral compared with conventional keyboards, though the same research notes that users typically need 10–30 or more hours of practice to regain their peak typing speed. If you work to a deadline, plan the transition during a lower-pressure period.
- Tented keyboards angle the two halves so the center is higher than the edges, reducing forearm pronation. They pair well with split designs and are especially useful for people who experience forearm fatigue. See ergonomic accessories for remote workers for a broader look at what fits different setups.
Mice and pointing devices:
- Vertical mice hold your hand in a handshake orientation, reducing forearm pronation and the ulnar deviation that comes with reaching sideways.
- Trackballs keep your hand stationary and move the cursor with your fingers or thumb, eliminating the arm sweep that causes deviation.
- Trackpads (especially large ones) let you use light finger movements rather than gripping and dragging, which reduces grip tension.
For gaming setups specifically, wrist position keyboard gaming ergonomics follows the same neutral-wrist rules, but mouse grip style and rapid lateral movements add extra demand. A mouse positioned at elbow height with a relaxed grip reduces the cumulative load during long sessions.
Wrist rests: use them correctly:
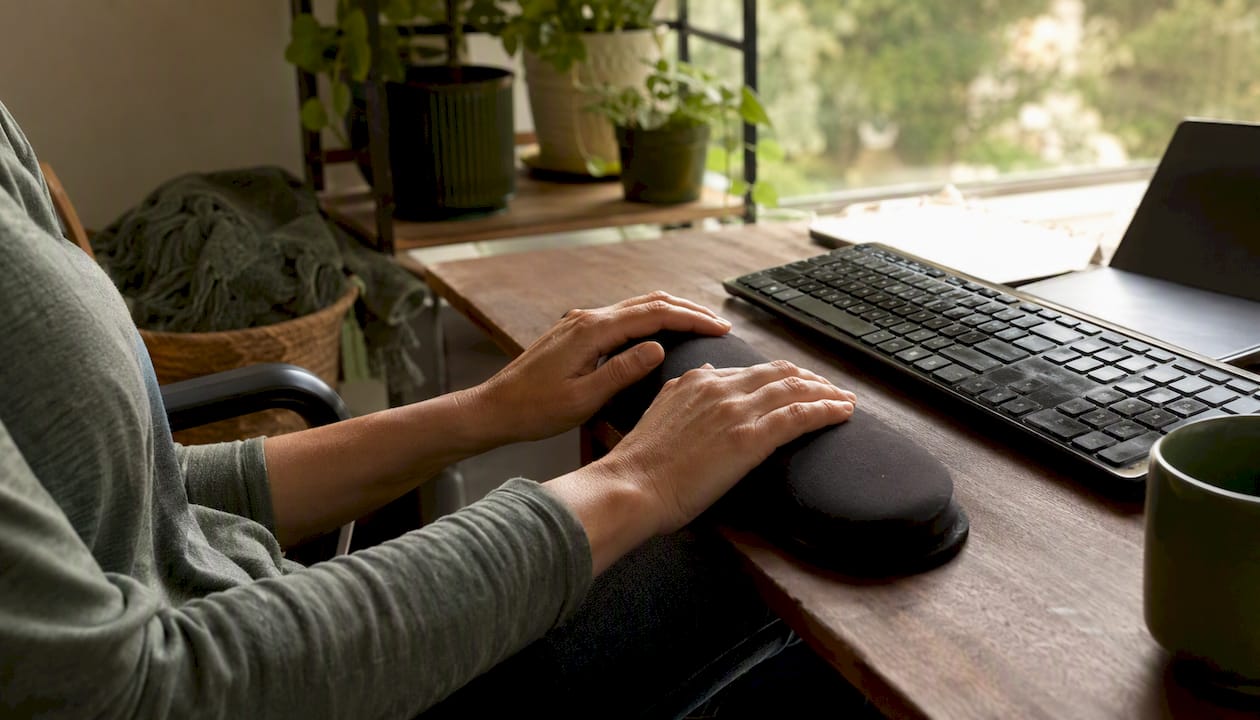
Wrist rests are for resting during pauses, not for anchoring your wrists while you type. Oregon State EHS guidance is clear on this: resting your wrists on a pad while actively typing creates a pivot point that increases awkward bending and strain. A gel or foam wrist rest is fine to touch down on between bursts of typing. During active keystrokes, your wrists should float.
Stretches, strengthening moves, and microbreaks that protect your wrists
Good posture reduces strain; movement clears it. Both matter.
- Wrist flexor stretch. Extend one arm in front of you, palm up. Use your other hand to gently pull your fingers back toward your forearm until you feel a stretch along the underside of your wrist. Hold 20–30 seconds. Switch sides.
- Wrist extensor stretch. Extend one arm, palm down. Gently pull your fingers toward your forearm until you feel a stretch along the top of your wrist and forearm. Hold 20–30 seconds. Switch sides.
- Nerve glide. Start with your arm at your side, elbow bent, palm facing up. Slowly straighten your elbow while tilting your head away from that arm. This mobilizes the median nerve through the carpal tunnel. Move slowly and stop if you feel sharp tingling.
- Forearm supination/pronation. Hold your arm at 90° with a light object (a pen works). Rotate your forearm so your palm faces up, then down, in a controlled motion. This builds the rotational control that supports neutral wrist posture during typing.
- Wrist circles. Slowly rotate each wrist through its full range of motion, five times in each direction. Do this at the start and end of every work session.
Break schedule: Take a 30–60 second microbreak every 20–30 minutes to shake out your hands and reset your posture. Every hour, step away from the keyboard for at least five minutes. The PMC carpal tunnel pressure study notes that typing itself raises carpal tunnel pressure above a static neutral hold, so movement is not optional for high-volume typists.
Stop and seek medical advice if you experience: persistent numbness or tingling in your thumb, index, or middle finger; pain that wakes you at night; weakness when gripping or pinching; or symptoms that do not improve after a week of corrected posture and regular breaks. These are signs that nerve compression may already be present, and a clinician should assess you before symptoms progress.
Common wrist posture mistakes and quick fixes you can do right now
Most wrist strain comes from a handful of repeatable errors. Here is what to look for and how to correct each one fast.
- Resting wrists on a hard surface while typing. Fix: lift your wrists off the desk or pad and let your arms support themselves from the shoulder. It feels strange at first but becomes natural within a few days.
- Keyboard placed too high. Fix: lower the keyboard tray, or raise your chair and add a footrest to keep your feet supported. Even a 1–2 inch drop can eliminate most wrist extension.
- Reaching for the mouse. Fix: move the mouse directly beside the keyboard so your elbow stays close to your body. If your keyboard has a number pad, consider a tenkeyless model to close the gap.
- Pivoting at the wrist to reach distant keys. Fix: move your whole hand and arm from the shoulder rather than bending your wrist sideways. Oregon State EHS notes that the rigid home-row habit can actually force wrist deviation if it keeps your hand anchored while your fingers stretch for far keys.
- Typing on a laptop in your lap or on a low coffee table. Fix: use a lap desk or move to a table. Laptop-on-lap posture almost always forces both wrist extension and forward head position simultaneously. For remote workers, bedroom office posture risks covers this pattern in detail.
- Phone typing with one thumb. Fix: hold the phone with both hands and use both thumbs, keeping your wrists as straight as possible. Avoid prolonged single-thumb sessions with your wrist bent sharply inward.
Run a two-minute posture check twice a day: once mid-morning and once mid-afternoon. Look at your wrists from the side and from above. If either view shows a bend, trace it back to keyboard height, chair height, or mouse position and adjust.
How to make neutral wrist positioning a lasting habit
Knowing the right position is the easy part. Keeping it through an eight-hour workday is where most people struggle. The answer is not willpower. It is building small, repeatable cues into your existing routine.
- Start with 15–30 minute blocks. Set a timer and commit to checking your wrist position only when it goes off. You are not trying to maintain perfect posture every second; you are building awareness in short windows.
- Pair posture checks with routine events. Every time you open a new browser tab, join a video call, or refill your water, glance at your wrists. Habit stacking like this builds the check into triggers that already happen dozens of times a day.
- Use a visual reminder. A small sticky note on your monitor that says “wrists straight?” costs nothing and works surprisingly well for the first two to three weeks while the habit is forming.
- Track your setup, not your posture. Measure and record your keyboard height, chair height, and monitor distance once. When something feels off later, you have a baseline to return to rather than starting from scratch.
- Introduce supports gradually. A lightweight wrist support or posture corrector can serve as a physical reminder during the adaptation phase, not as a substitute for correct setup. The goal is habit formation, not immobilization. Use it during high-volume typing sessions and phase it out as neutral posture becomes automatic. For long workday setups, pairing a support with a properly adjusted desk gives you both the cue and the correct environment.
Pro Tip: Reassess your setup every four to six weeks, especially if you change chairs, desks, or keyboards. A setup that was neutral in one configuration may not be neutral after a hardware swap. A five-minute ruler check of keyboard height relative to your elbow takes less time than a week of wrist discomfort.
The part most ergonomics guides skip
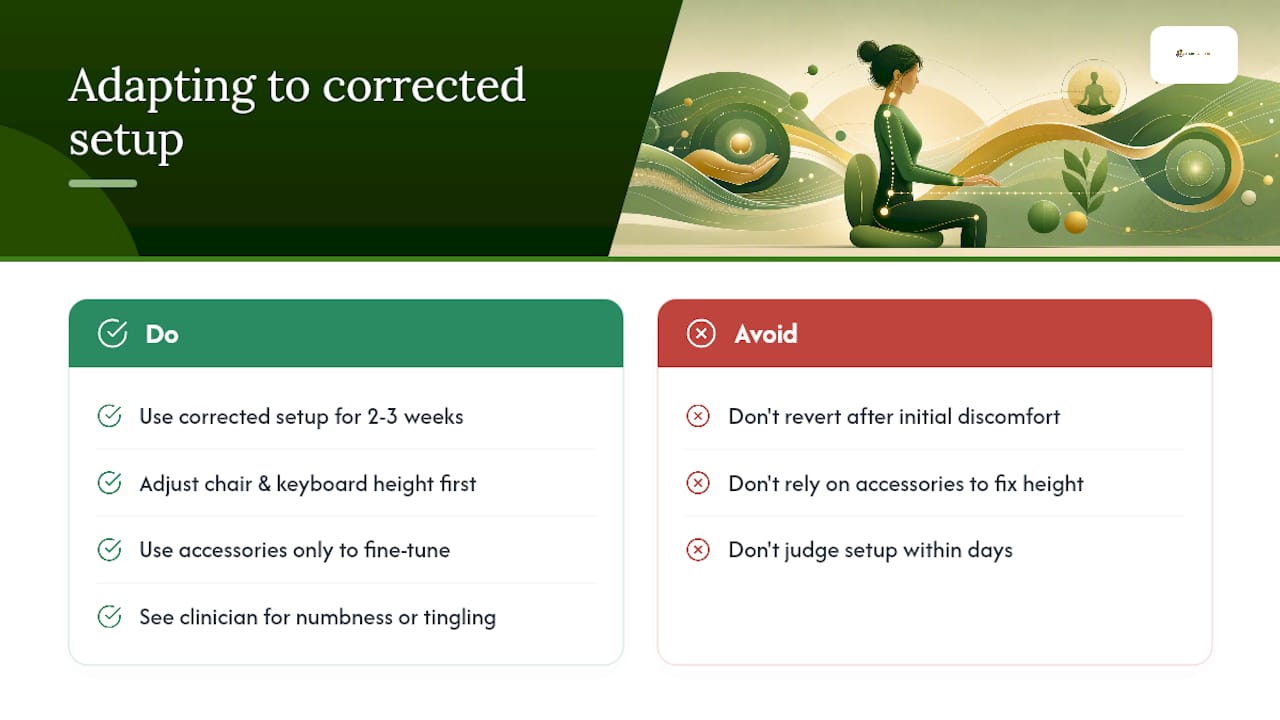
Most wrist ergonomics content stops at “keep your wrists neutral” and leaves you to figure out the rest. What gets skipped is the honest part: adaptation takes longer than a week, and the discomfort you feel in the first few days of a corrected setup is not a sign that the setup is wrong.
When you shift from a high keyboard with positive tilt to a lower keyboard with negative tilt, your forearm muscles are suddenly working in a range they are not conditioned for. That mild fatigue is normal. The mistake is interpreting it as pain and reverting to the old setup. Give a corrected position at least two to three weeks before judging it.
The other thing worth saying plainly: no accessory replaces setup. A gel wrist rest, a split keyboard, or a posture support can all help at the margins, but if your keyboard is three inches above your elbows, no accessory fixes that. Start with the chair and keyboard height. Everything else is fine-tuning.
And if you have been typing with poor wrist alignment for years and you are already experiencing numbness or nighttime tingling, please see a clinician before leaning on ergonomics alone. Ergonomics prevents and reduces strain; it does not treat an established nerve compression. Workplace wellness posture is a long game, and the earlier you start, the more options you have.
Lightweight support for the habit-building phase
Getting your desk setup right is step one. Staying consistent through back-to-back meetings, late-night gaming sessions, and remote work from less-than-ideal spaces is where most people need a little backup. Habitposture’s lineup of non-bulky posture supports and ergonomic accessories is built for exactly that phase: the weeks between “I know what neutral posture is” and “my body just does it automatically.”
The supports work as physical reminders, not rigid immobilizers. Wear one during your highest-volume typing blocks, pair it with the setup steps above, and let your body relearn the position through repetition rather than effort. When neutral wrist posture becomes your default, you phase the support out. No guilt trips. No permanent dependency.
Browse the full catalog and find the right fit for your setup at Habitposture.
Sources
These are the primary references behind the guidance in this article. Each one serves a different purpose depending on how deep you want to go.
- Effect of Wrist Posture on Carpal Tunnel Pressure while Typing - PMC
- CUergo: Neutral Posture Typing
- Alternative keyboards study (CDC / Occupational ergonomics literature)
- OSHA: Components: Wrist/palm support
- Carpal tunnel syndrome - Cleveland Clinic